Table of Contents
- Advantages of Inventory Tracking with MaxxPay
- MaxxPay Point of Sale Options
- How to Set Up Inventory Tracking on Your MaxxPay System
Effective inventory management is key for any small business.
Whether you run a food truck, shoe repair shop, or high-end clothing boutique, it is important to keep track of your inventory. Nothing hinders the profitability of a business (especially a small business) quite like carrying the wrong amount of inventory.
Key Takeaways You Will Get From This Article
1. MaxxPay Point of Sale solution can track inventory for you, helping you maintain stock and profitability.
2. Enabling Inventory Tracking on your MaxxPay point of sale system will allow you to input the exact number of each item you have on hand and track every item you sell.
3. You can turn on low quantity alerts, so you know when it’s time to place a restock order.
We all know what happens when there’s not enough inventory – customers complain and leave dissatisfied. In some situations, running out of stock at the wrong time can cost you an entire customer relationship, which hurts your business and your pride.
But, what about when there’s too much inventory? Well, this can also eat into your profits very quickly.
For example, if you stock too many sweaters in your boutique at the beginning of fall, you might not sell through them all by spring. This means that when the seasons change, you’ll need to deeply discount those sweaters to get them off the shelf and make room for spring skirts and dresses. If it takes too long to sell those sweaters, you’ll end up taking a loss on them.
The same concepts apply to the restaurant business.
For example, if you don’t have enough meat on-hand to serve the weekend steakhouse dinner special to every customer who orders it, you’re disappointing hungry diners and missing out on those sales. However, if you have too much steak on hand, those expensive cuts of meat can go to waste and hurt your profitability.
So, how do you keep an eye on your inventory levels when you’re also trying to serve customers, manage employees, and oversee the operations of your business?
You don’t.
Instead, let MaxxPay® Point of Sale do the tracking for you!
In this post, we’ll share how tracking inventory with MaxxPay can help you save money and gain peace of mind. Plus, we’ll share a step-by-step guide on how to enable inventory tracking for your items. Let’s get started!
Advantages of Tracking Inventory with MaxxPay
Did you know that your inventory is the most expensive asset your small business holds?
As we mentioned earlier in this post, if you hold too much inventory for too long, you run the risk of it becoming obsolete. On the contrary, if you don’t hold enough inventory, you run the risk of stocking out and damaging your relationships with customers.
We know it sounds like a lose-lose, but it’s not. You just have to find that sweet spot in the middle.
That’s where MaxxPay comes in.
A MaxxPay Point of Sale solution can track inventory for you, helping you maintain stock and profitability. Here are some of the advantages of trusting MaxxPay with your inventory:
-
- Automate inventory tracking.
Enabling this feature allows you to input the exact number of each item you have on-hand and track every item you sell.
- Automate inventory tracking.
-
- Generate reports anytime, anywhere.
MaxxPay is equipped with a cloud-based portal so you can generate real-time sales, inventory, and customer reports from anywhere with an internet connection.
- Generate reports anytime, anywhere.
-
- Know when you’re running low.
You can turn on low quantity alerts to notify you when an item is running low and it’s time to restock. This also ensures your team won’t try to sell an item that is out of stock.
- Know when you’re running low.
-
- Increase business profitability.
MaxxPay presents uncompromising quality and functionality for a fraction of the cost of other point of sale systems.
- Increase business profitability.
-
- Manage multiple locations remotely.
Does your business have more than one location? You can keep an eye on sales and inventory levels for all of them in one place with MaxxPay.
- Manage multiple locations remotely.
If you’re already using MaxxPay as your point of sale solution, congratulations! All these advantages and more are currently in your pocket.
If you’re not using MaxxPay, allow us to share a bit more information about this solution.
Simple, Secure, Scalable
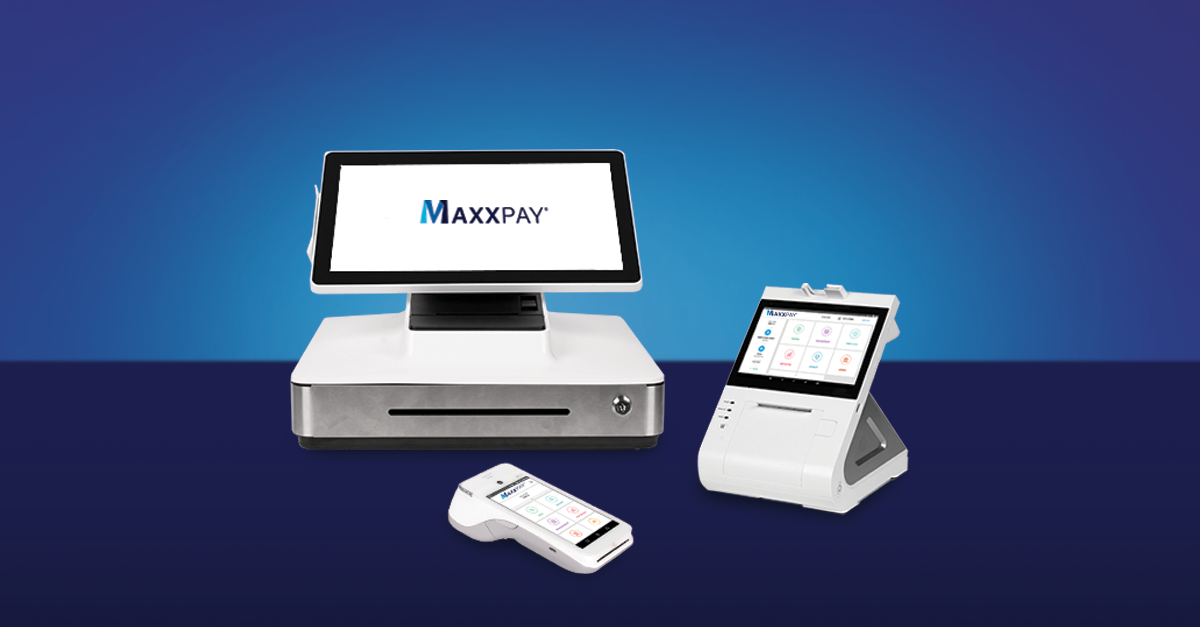
MaxxPay is available in three variations and is designed to grow and scale with any small to mid-sized business. Here’s a little more information about each variation:
-
- MaxxPay Mini
MaxxPay® Mini is the perfect all-in-one payment solution for the busy business owner. The cloud-based POS solution makes accepting payments simple and helps you manage your business, all while fitting in the palm of your hand.
- MaxxPay Mini
-
- MaxxPay Pro
MaxxPay® Pro is a complete, cloud-based POS solution that offers top performance in a compact package. This system makes getting paid easy and is always secure. Trust MaxxPay® Pro to help your business grow!
- MaxxPay Pro
-
- MaxxPay Premier
The MaxxPay® Premier cloud-based point of sale system offers retailers and restaurants a complete solution for a fraction of the cost of other systems. This system boasts uncompromising quality and functionality to help take your business to the next level.
- MaxxPay Premier
To learn more about the unique feature highlights of these solutions, click here.
How to Set Up Inventory Tracking on Your MaxxPay System
Enabling Inventory Tracking on your MaxxPay point of sale system will allow you to input the exact number of each item you have on hand and track every item you sell. You can also turn on low quantity alerts, so you know when it’s time to place a restock order!
It’s important to note that inventory tracking is location specific. If your business has multiple locations, you will first need to choose which location to enable tracking. Complete this by clicking the “Locations” tab at the top of your screen and selecting a location from the dropdown that appears.
To turn on Inventory Tracking, follow the steps below:
-
- Log in to the portal and select “Store Setup” on the left side of the navigation menu. Then, choose “Store Operations” from the list.
- On the Store Operations page, scroll down to the Business Options panel.
- Enable inventory tracking by checking the box next to “Track quantities for selected products.”
- Log in to the portal and select “Store Setup” on the left side of the navigation menu. Then, choose “Store Operations” from the list.
You will also notice you have the option to allow item sales when their quantity is zero. To avoid this, turn on low quantity alerts by checking the corresponding box for each item. When you check these boxes, a text box will appear below. Enter the number at which you would like to start receiving low quantity alerts for each item.
For example, let’s say you want to be alerted when you have five blue sweaters remaining in size medium. Find that item on your list, check the ‘low quantity alerts’ box, and enter the number 5 in the text box.
Click “Save” in the Business Options panel to save your changes.
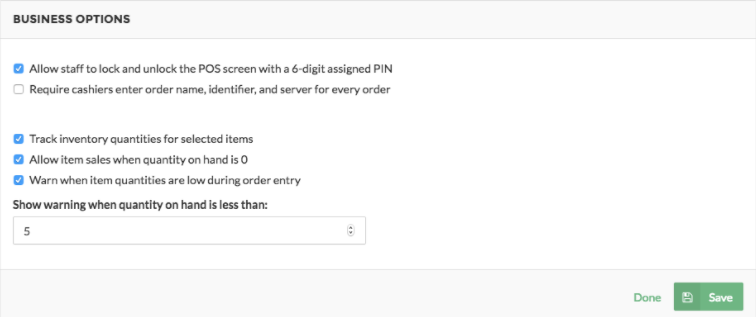
Now that you have enabled inventory tracking, it’s time to load your current inventory into the system. Follow the steps below to complete this:
-
- Select “Items” on the left side of the navigation menu, and then choose “Item Library” from the list.
- On this page, you will see your items listed in multiple tables, depending on how you have organized them. Each table includes a column labeled “Track Qty”. To enable tracking for an item, simply check the box to the left of the text box in the “Track Qty” column for your item.
- Next, enter the amount you currently have on-hand for that item in the text box.
- Select “Items” on the left side of the navigation menu, and then choose “Item Library” from the list.
Likewise, if you would like to disable tracking for a specific item, simply uncheck the corresponding box in the “Track Qty” column.
When you are finished editing, click “Save” in the top right corner of the screen.
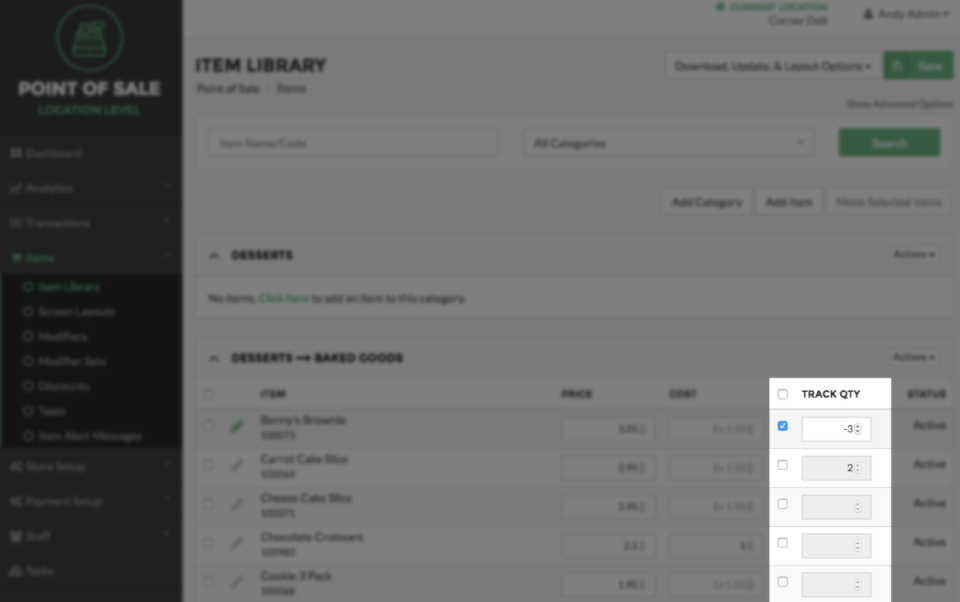
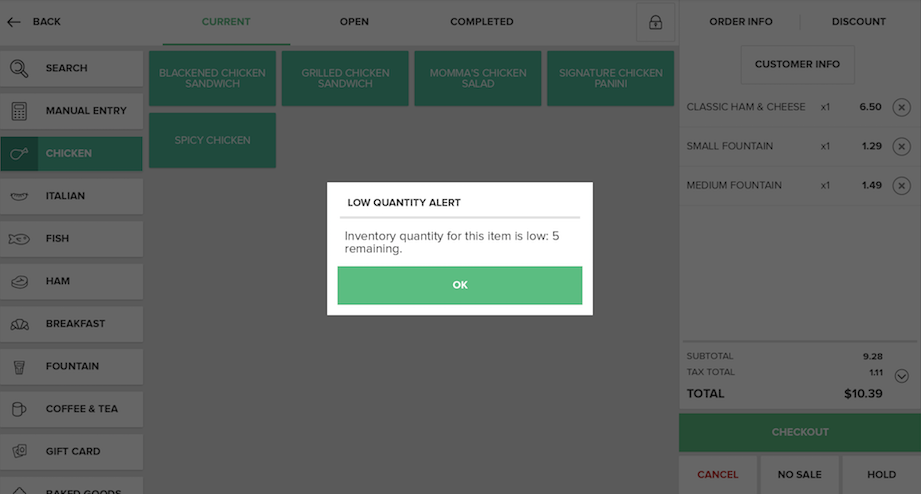
Now that you have saved your edits, your inventory is ready to be tracked! As you sell an item you set up for tracking, its corresponding quantity on the “Item Settings” page will decrease. If the amount on-hand reaches the low quantity limit you set in the portal, it will trigger a warning on your point of sale.
It’s that simple!
Have Questions or Need Help?
Our 24/7/365 customer support team is happy to help with any questions you may have. Just send us a message or give us a call at (800) 615-1330.
You can also check out the MaxxPay Online Help Center for quick access to how-to and getting started guides.
Are you interested in adding a MaxxPay solution to your business? Send a message to our sales team or give them a call at (866) 472-2141.
We’re here for you when you need us.
Sources: The Balance SMB, MaxxPay
